首页 Android正文

Android 模块化开发实战:Dagger2实现模块化(组件化)

yuange Android 2019-01-11 1369 0

随着移动平台的不断发展,软件慢慢变的越来越复杂,业务繁多,体积臃肿;为了降低大型软件复杂性和耦合度,同时也为了适应模块重用、多团队并行开发测试等等需求,Android社区提出了两种解决方案:模块化和插件化。插件化暂且按下不提,本文主要讲述模块化。从基本思路上来讲,模块化的实现大体上来讲都是差不多的,本文将着重讲述基本思路。此外,在实践的过程中也有特别的地方:Databinding在模块化中的坑,Dagger2在模块化中的应用,页面统一跳转,模块化通信方式设计,模块层级架构设计等。这些问题将在本文和后面的系列文章中一一介绍。

什么是模块化

什么是模块化呢?有一种定义是:模块化是一种处理复杂系统分解为更好的可管理模块的方式。由此可见,模块化思路下构成的复杂系统是由各个可管理的子模块构成的,每个子模块之前相互独立,并通过某种特定的方式进行通信。
在工业上面,有模块化汽车的概念,也有模块化手机的概念,各个模块根据一定的标准进行生产,生产之后可以直接进行各个模块的组装,某个模块出现问题之后,可以单独对这个模块进行替换。举个例子,同样一款汽车,有各中配置不同的版本,比如发动机不同。这些发动机都按照一定的标准生产,但是发送的输出和能耗并不同。重要的是其接口标准一样。从可替换这一点来讲,和软件开发中的可插拔是异曲同工的。

Android 开发中有两个比较相似的概念:组件化和模块化,这里需要进行区分的。
组件化:指的是单一的功能组件,如地图组件、支付组件、路由组件(Router)等等;
模块化:独立的业务模块,模块相对于组件来讲粒度更大。

模块化的好处是显而易见的。
• 多团队并行开发测试;
• 模块间解耦、重用;
• 可单独编译打包某一模块,提升开发效率。

模块Debug和Release处理

对于模块化项目,每个单独的 Business Module 都可以单独编译成 APK。在开发阶段需要单独打包编译,项目发布的时候又需要它作为项目的一个 Module 来整体编译打包。简单的说就是开发时是 Application,发布时是 Library。因此需要在 Business Module 的 build.gradle 中加入如下代码:

if(isBuildModule.toBoolean()){
    apply plugin: 'com.android.application'
}else{
    apply plugin: 'com.android.library'
}

isBuildModule 在项目根目录的 gradle.properties 中定义:

isBuildModule=false

同样 Manifest.xml 也需要有两套:

sourceSets {
   main {
       if (isBuildModule.toBoolean()) {
           manifest.srcFile 'src/main/debug/AndroidManifest.xml'
       } else {
           manifest.srcFile 'src/main/release/AndroidManifest.xml'
       }
   }
}

debug 模式下的 AndroidManifest.xml :

<manifest xmlns:android="http://schemas.android.com/apk/res/android"
    package="com.dajiazhongyi.dajia.pedumodule">

    <uses-permission android:name="android.permission.INTERNET" />
    <uses-permission android:name="android.permission.READ_PHONE_STATE" />
    <uses-permission android:name="android.permission.ACCESS_NETWORK_STATE" />
    <uses-permission android:name="android.permission.ACCESS_WIFI_STATE" />
    <uses-permission android:name="android.permission.CHANGE_WIFI_STATE" />

    <application
        ...
        >

        <activity
            android:name="com.dajiazhongyi.dajia.loginmodule.ui.DaJiaLauncher"
            android:exported="true"
            android:screenOrientation="portrait">
            <intent-filter>
                <action android:name="android.intent.action.MAIN" />
                <category android:name="android.intent.category.LAUNCHER" />
            </intent-filter>
            <intent-filter>
                <action android:name="android.intent.action.VIEW" />

                <category android:name="android.intent.category.DEFAULT" />
                <category android:name="android.intent.category.BROWSABLE" />

                <data android:scheme="dajia" />
            </intent-filter>
        </activity>

        <activity
            android:name=".ui.MainActivity"
            android:screenOrientation="portrait"/>

    </application>

</manifest>

realease 模式下的 AndroidManifest.xml :
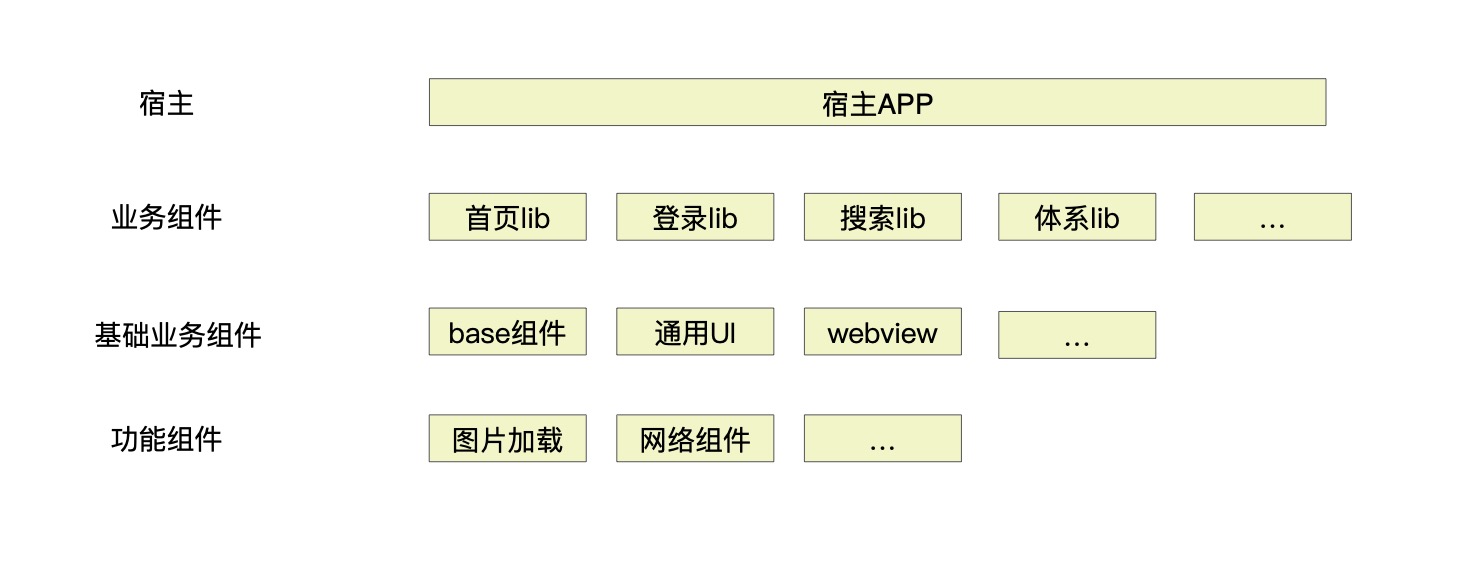
<manifest xmlns:android="http://schemas.android.com/apk/res/android"
    package="com.dajiazhongyi.dajia.pedumodule">

    <application
        android:allowBackup="true"
        android:supportsRtl="true">

        <activity
            android:name="com.dajiazhongyi.dajia.pedumodule.ui.PEducationListActivity"
            android:screenOrientation="portrait"/>

        <activity
            android:name="com.dajiazhongyi.dajia.pedumodule.ui.syslib.SystemEduDetailListActivity"
            android:screenOrientation="portrait"/>

        <activity
            android:name="com.dajiazhongyi.dajia.pedumodule.ui.syslib.SystemEduListActivity"
            android:screenOrientation="portrait"/>

    </application>

</manifest>

模块化分层设计

合理的模块化分层设计是非常重要的,就像一个房子一样,合理的框架设计是成功的保证。
模块化分层设计需要达到以下几个目标:

  1. 模块职责明确;

  2. 模块代码边界清晰;

  3. 模块通信

模块职责明确

根据职责进行分层设计是合理有效的,以下是在项目实践中采用的分层设计。

模块化分层设计

SDK
SDK层包括的内容如图所示,需要强调的是并不是所有的第三方Libraries都放到SDK,必须是通用的基础级别的。

组件库
我们将各个业务模块公用的组件整合到组件库中,组件库并不一定是一个module,它也可以是多个module,实际使用的时候更多的被业务模块依赖。

BaseCore
这是最重要的一个层级,APP核心的部分就是它,BaseCore可以用通用的定义以下几个部分:

核心层设计


CoreAccount: APP账号管理,账号登录、注销、Profile信息获取等;
CoreNetwork: 以Retrofit2为例,CoreNetwork并不提供业务模块的API,只是提供基础的网络状态管理、网络错误管理;
CoreStorage: 处理SQLite、Preferences;
CoreCommunication:模块之间的通信主要有三种:事件通知、页面跳转(Activity、Service)、接口调用。模块通信是最重要的层次,后面会重点讲

此外,这个层次是最容易代码越界的层次,随着业务的不断复杂,业务模块中的代码是极有可能下沉到BaseCore的,从而导致Core层代码越来越冗余。清晰合理的代码边界规范是重要的。

业务模块
业务模块的拆分粒度需要把控,太小的粒度并不是很合理。其中App(Release)是最终发布出去的版本,它是对其他模块1...N 的整合。各个业务模块在debug'阶段,可以独立打包成apk进行调试,在release阶段,则作为APP的module被引用。各个业务模块之间不进行相互调用,它们之间的通信通过BaseCore层来实现。

代码边界

合理的代码边界约定可以保证层次的清晰、避免架构变得冗余,虽然没法完全保证,毕竟定期的重构是无法避免的。

  • 各个业务模块之间无依赖关系,模块之间页面的跳转通过ARouter等页面路由协议进行;

  • 模块之间的事件通信采用EventBus,并依赖于BaseCore层的事件Manager进行管理;

  • 模块之间的功能暴露全部通过接口,接口需要下沉到BaseCore层,接口使用前必须先注册,调用方式形如下,后续文章会详细介绍:

ServiceManager.regist(PluginService.class); 
ServiceManager.get(PluginService.class).execute();
  • 组件库组件必须提供个性化定制,方便业务模块使用;

  • 合理控制各组件和各业务模块的拆分粒度,太小的公有模块不足以构成单独组件或者模块的,我们先放到类似于 CommonModule 的组件中,在后期不断的重构迭代中视情况进行进一步的拆分;

  • 上层的公有业务或者功能模块可以逐步下放到下层,下放过程中按照层次职责归类下放;

  • 各个模块之间的横向依赖关系,比如在使用PluginService2之前,需要先注册PluginService1,这种依赖管理后续会详细介绍

模块通信

模块通信需要解决三大问题:

  1. 页面跳转

  2. 事件通知

  3. 接口调用

页面跳转

这里介绍一款页面路由神器:ARouter https://github.com/alibaba/ARouter

本着能用、够用、好用的原则,这款神器支持以下功能:

  1. 支持直接解析标准URL进行跳转,并自动注入参数到目标页面中

  2. 支持多模块工程使用

  3. 支持添加多个拦截器,自定义拦截顺序

  4. 支持依赖注入,可单独作为依赖注入框架使用

  5. 支持InstantRun

  6. 支持MultiDex(Google方案)

  7. 映射关系按组分类、多级管理,按需初始化

  8. 支持用户指定全局降级与局部降级策略

  9. 页面、拦截器、服务等组件均自动注册到框架

  10. 支持多种方式配置转场动画

  11. 支持获取Fragment

  12. 完全支持Kotlin以及混编(配置见文末 其他#5)

其调用方式如下:

1. 添加注解
@Route(path = "/test/activity")
public class YourActivity extend Activity {
    ...
}

2. 初始化SDK
if (isDebug()) {           // 这两行必须写在init之前,否则这些配置在init过程中将无效
    ARouter.openLog();     // 打印日志
    ARouter.openDebug();   // 开启调试模式(如果在InstantRun模式下运行,必须开启调试模式!线上版本需要关闭,否则有安全风险)
}
ARouter.init(mApplication); // 尽可能早,推荐在Application中初始化

3. 发起路由操作
// 1. 应用内简单的跳转(通过URL跳转在'进阶用法'中)
ARouter.getInstance().build("/test/activity").navigation();

// 2. 跳转并携带参数
ARouter.getInstance().build("/test/1")
   .withLong("key1", 666L)
   .withString("key3", "888")
   .withObject("key4", new Test("Jack", "Rose"))
   .navigation();

实际应用中,在BaseCore中实现一个RouterManager,管理路由初始化,跳转等事宜:

public class RouterManager {

    /**
     * Router Path
     */
    public static final String URL_WELCOME = "/loginModule/welcome";
    public static final String URL_LOGIN = "/loginModule/login";

    public static final String URL_MAIN_LOGIN = "/loginModule/main";
    public static final String URL_MAIN_PEDU = "/peduModule/main";

    ...

    /**
     * Module application name
     */
    public static final String MODULE_LOGIN = "loginmodule";
    public static final String MODULE_PEDU = "pedumodule";

    public static void initRouter(Application application) {
        if (BuildConfig.DEBUG) {
            ARouter.openLog();     // 打印日志
            ARouter.openDebug();   // 开启调试模式(如果在InstantRun模式下运行,必须开启调试模式!线上版本需要关闭,否则有安全风险)
        }
        ARouter.init(application);
    }

    public static void gotoNewPage(Context context, String pageUrl) {
        ARouter.getInstance().build(pageUrl).navigation();
    }

    public static void goWelcome(Context context) {
        ARouter.getInstance().build(URL_WELCOME).navigation();
    }

    public static void goLogin(Context context) {
        ARouter.getInstance().build(URL_LOGIN).navigation();
    }

    public static void goHome(Context context) {
        String packageName = context.getApplicationInfo().packageName;
        LogUtils.logD(packageName);
        String suffix = packageName.substring(packageName.lastIndexOf(".") + 1);
        switch (suffix) {
            case MODULE_LOGIN:
                ARouter.getInstance().build(URL_MAIN_LOGIN).navigation();
                break;
            case MODULE_PEDU:
                ARouter.getInstance().build(URL_MAIN_PEDU).navigation();
                break;
        }
    }

    ...
}

更多使用方法可以参考github该库的详细介绍

由于篇幅原因,事件通知、接口调用将在后续文章中介绍!!

其他问题

资源名冲突

对于多个 Bussines Module 中资源名冲突的问题,可以通过在 build.gradle 定义前缀的方式解决:

defaultConfig {
   ...
   resourcePrefix "module_name_"
   ...
}

而对于 Module 中有些资源不想被外部访问的,我们可以创建 res/values/public.xml,添加到 public.xml 中的 resource 则可被外部访问,未添加的则视为私有:

<resources>
    <public name="module1_str" type="string"/>
</resources>

问题

在采用普通(非模块化)架构的项目中使用Dagger2,一般会通过ApplicationComponent、ActivityComponent、FragmentComponent等方式来控制所注入对象的生命周期,其生命周期分别是Application全局单例、Activity局部单例和Fragment局部单例,很自然的,只需要处理好Component之间的依赖关系,并在Application和Activity、Fragment中处理好Component的创建逻辑即可。
在模块化项目中,Dagger2却有不一样的使用,我还是以上一篇文章的架构设计为例,其问题主要表现在两点:

  1. 如何保证BaseCore中的某些类全局单例,比如那些存储管理、网络组件等;

  2. 同一个业务模块,其在Debug时是独立的Application,在Release时又是Library,如何让业务模块中的Dagger2管理不受Application变化的影响;

  3. 如何保证业务模块中的某些类模块内单例

模块化分层设计

解决方案

先来看一下模块化中的Dagger2注入需求图

模块化注入

无论BaseCore还是各个业务模块,都存在这样的单例类和非单例类,需要注入到上层应用层,其中BaseCore是全局注入,而业务模块中只注入该模块内,其他模块无法注入。
为满足这样的需求,我采用的解决方式是:

  1. 对Component进行分层设计,明确Component之间的依赖关系,控制不同层次Component的生命周期,以达到Component生命周期和Application、Activity、Fragment等一致;

  2. 不同层次的Component设计不同的scope进行标注,通过scope可以保证在本层次Component注入的实例是单例的

这个方案总结下来就是:合理控制Component的创建,使得Component和需要注入的对象(Application、Activity等)生命周期一致;不同层次Component采用scope标注,以实现Component内局部单例。

方案的架构图如下:

BaseCore中对单例类的处理如下:

@Module
public class SingletonModule {

    @Provides
    @Singleton
    RxBus provideRxBus() {
        return RxBus.getInstance();
    }

    ...
}

@Module(includes = SingletonModule.class)
public class AppModule {
    private final Application application;

    public AppModule(Application app) {
        application = app;
    }

    @Provides
    @Singleton
    Application provideApplication() {
        return application;
    }

    @Provides
    @Singleton
    Context provideContext() {
        return application;
    }
}

@Singleton
@Component(modules = {AppModule.class, SingletonModule.class})
public interface BaseAppComponent {

    RxBus rxBus();

    ...
}

对非单例类的处理如下:

@Module
public class BaseViewModule {

    private final Activity activity;

    public BaseViewModule(Activity activity) {
        this.activity = activity;
    }

    @Provides
    @PerView
    Activity provideActivity() {
        return this.activity;
    }

    @Provides @PerView
    JsInterface jsInterface() {
        return new JsInterface(activity);
    }
}

@PerView
@Component(modules = BaseViewModule.class)
public interface BaseViewComponent {

    Activity activity();

    ...
}

业务模块中对单例类的处理:

@Module
public class BusinessAModule {

    @Provides
    @AppScope
    BusinessAManager provideBusinessAManager(Applition app) {
        return BusinessAManager.getInstance(app);
    }

    ...
}

@AppScope
@Component(dependencies = BaseAppComponent.class, modules = {BusinessAModule.class})
public interface BusinessAAppComponent extends AppComponent {

 /* Note: 必须显式的提供BaseAppComponent所能提供的对象
  * 理由:BaseAppComponent中的对象对于BusinessAAppComponent是可见的,
  * 但是对于依赖于BusinessAAppComponent的上层ActivityComponent 是不可见的,所以需要再次显式的声明
  */
    RxBus rxBus();

    ...
}

业务模块中的非单例类可以在 BusinessAActivityModule 中提供。

经过以上的处理,问题来了,如何在业务层中的Activity等目标类中inject上述对象呢?我们来看业务模块中的 ActivityComponent:

@PerView
@Component(dependencies = {BusinessAAppComponent.class}, modules = BaseViewModule.class)
public interface ActivityComponent extends android.databinding.DataBindingComponent {

    void inject(MainActivity activity);

    ...
}

这样,你就可以在MainActivity中通过ActivityComponent 注入BaseAppComponent、BusinessAAppComponent、BaseViewModule暴露出来的对象了。这里有个细节,ActivityComponent继承自DataBindingComponent,之所以要这么做是为了满足在Databinding中使用Dagger2依赖注入。

最后,还有个关键问题:如何处理Debug和Release模式下AppComponent初始化问题?只有保证了AppComponent的单例,才能保证通过其注入对象的单例。

我在BaseCore上定义一个接口:

public interface AppComponent {}

不同模块中的BusinessAAppComponent、BusinessBAppComponent继承它

public interface BusinessAAppComponent extends AppComponent {}

public interface BusinessBAppComponent extends AppComponent {}

再定义一个接口:

public interface AppModuleComponentDelegate {    AppComponent initAppComponent();}

在BaseCore中定义一个BaseModuleKit,目的在于获取BaseAppComponent:

public class BaseModuleKit {

    private static BaseModuleKit instance;
    private BaseAppComponent component;

    public static BaseModuleKit getInstance() {
        if (instance == null) {
            synchronized (BaseModuleKit.class) {
                if (instance == null) {
                    instance = new BaseModuleKit();
                    Application application = BaseApplication.getInstance();
                    instance.component = DaggerBaseAppComponent.builder().appModule(new AppModule(application)).build();
                }
            }
        }
        return instance;
    }

    public BaseAppComponent getComponent() {
        return component;
    }
}

再定义一个BusinessModuleKit, 目的在于获取到BusinessAAppComponent:

public class BusinessAModuleKit {

    private static BusinessAModuleKit instance;

    private Application application;
    private AppComponent component;

    public static BusinessAModuleKit getInstance() {
        if (instance == null) {
            synchronized (BusinessAModuleKit.class) {
                if (instance == null) {
                    instance = new BusinessAModuleKit();
                }
            }
        }
        return instance;
    }

    public BusinessAModuleKit init(Application application, AppModuleComponentDelegate appModuleComponentDelegate) {
        this.application = application;
        this.component = appModuleComponentDelegate.initAppComponent();
        return this;
    }

    public Application getApplication() {
        return application;
    }

    public AppComponent getComponent() {
        return component;
    }
}

以上的思路就是:通过BaseModuleKit保证BaseAppComponent单例;通过BusinessAModuleKit保证BusinessAAppComponent单例;ActivityComponent的创建需要依赖于这两个,必须保证这两个是单例。

下面再讲述一下BusinessAAppComponent 和 ActivityComponent的创建。

在业务模块中的BusinessAApplication 中:

private AppModuleComponentDelegate aAppComponentDelegate = new AppModuleComponentDelegate() {
    @Override
    public AppComponent initAppComponent() {
        BusinessAAppComponent appComponent = DaggerBusinessAAppComponent.builder()
                    .baseAppComponent(BaseModuleKit.getInstance().getComponent())
                    .build();
        return appComponent;
    }
};

BusinessAModuleKit.getInstance().init(this, aAppComponentDelegate);

在MainActivity中:

private ActivityComponent activityComponent;

public ActivityComponent activityComponent() {
    if (activityComponent == null) {
        activityComponent = DaggerActivityComponent.builder()
                .businessAAppComponent((BusinessAAppComponent) BusinessAModuleKit.getInstance().getComponent())
                .baseViewModule(new BaseViewModule(this))
                .build();
    }
    return activityComponent;
}

// 注入
activityComponent().inject(this);

至此,Dagger2在模块化中的处理就介绍完了,讲的有点乱,希望没有把大家绕晕。

此外还有几个有意思的问题有待进一步的探究:

  1. 如果要进一步细化业务模块的生命周期,比如增加业务模块的注册、卸载,在这种情况下,业务模块中的Dagger2如何处理?

  2. 做成一个开源库,方便在模块化中直接引入


评论

在线客服-可直接交谈

您好!有什么需要可以为您服务吗?